Urushi Articles
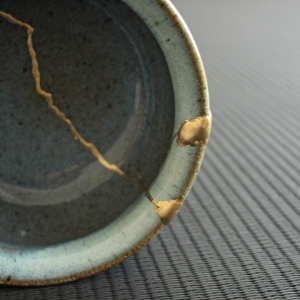
Kintsugi, the art of restoring beloved vessels
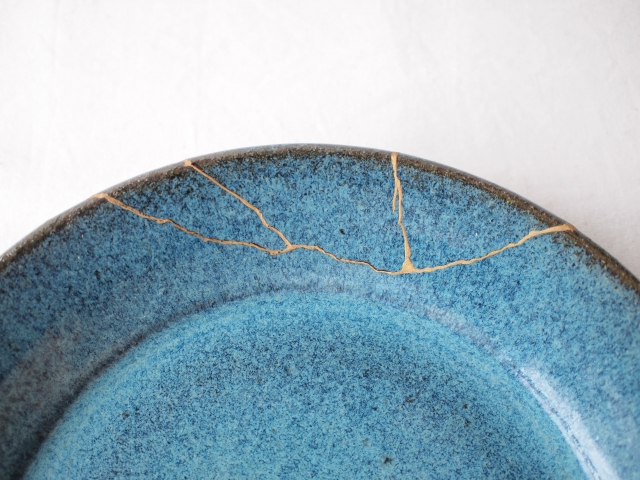
Many of you may have had the experience of having a piece of pottery that you cherished but no longer use because it is chipped or broken, but you still do not want to throw it away because of your attachment to it. We would like to introduce the process of “kintsugi”, or the art of hand-recreating a piece of vessels by yourself.
What is Kintsugi?
One of the traditional techniques of Japanese lacquer craft, kintsugi is the process of gluing broken or chipped pottery or other damaged parts with urushi lacquer and then decorating them with gold.
Required wear
Urushi Lacquer can cause a rash, so avoid contact with the skin.
- Wear rubber gloves (powder-free ones are recommended) while working.
- Wear long sleeves/long pants/socks that cover as much skin as possible.
Materials and tools required
| Materials |
For adhesion
For finishing
|
|---|---|
| Tools |
For working
For cleaning
|
Simple Steps for Kintsugi
[1] Vessel Cleaning
Wash and dry the vessel you wish to kintsugi well. You may bleach them. If it is dirty, it may come off again even if it is glued.
[2] Making glue
Make the “glue” called “麦漆” (mugi-urushi, literally meaning wheat lacquer) to be used when attaching damaged parts.
- On a work board, add a teaspoon of flour and a little water, and knead well with a bamboo spatula until the mixture becomes the consistency of bread dough.
- Add the same amount of raw urushi lacquer to the flour and knead well with a bamboo spatula.
- Mix raw urushi and flour at a ratio of 1:1.
- Basically, make only the amount you will use. The glue will dry more slowly with the time.
- It is convenient to use a small glass or acrylic/plastic plate when mixing.
- When adding water to the flour or kneading the raw lacquer, add a little at a time, even if it is troublesome, and keep an eye on the consistency.
[3] Mugi-Urushi coating and gluing
Apply the glue evenly to both cross-sections of the broken pieces, and glue the pieces together when the lacquer has been applied evenly.
- Apply the glue with a bamboo spatula.
- When the pieces are glued, the glue should pushed out a little bit.
- After use, wipe the bamboo spatula (with ethanol diluted in water if available) and wipe off any dirt with a tissue (as the lacquer on the spatula will harden).
[4] Fixing the adhesive part
Fix the adhesive part with masking tape so that it does not shift.
- When the glued part is fixed, it should be in good condition if a little bit of glue protrudes from the glued part.
[5] Drying in a muro (drying room)
After leaving the urushi lacquer for about half a day, it is placed in a muro for about 10 days. Muro is a room where urushi lacquer is dried after being applied.
The conditions required for urushi lacquer to harden are a temperature of about 25°C and humidity of about 70% to 80%.
A room for hardening urushi lacquer in such an environment is called a muro.
It is not always necessary to maintain these temperature and humidity levels, but the above environment makes it easier for the lacquer to dry. Even if the temperature and humidity are low, the lacquer will harden, but it will take much longer.
In this article, we will walk you through how to make muro using cardboard boxes that you are familiar with. (Acrylic cases are also recommended.)
- Dampen the cardboard slightly with a mist spray. The cardboard can be oriented vertically or horizontally. Use the orientation appropriate for the size of the vessel.
- Place plastic sheet on the bottom.
- Place a wet a towel or cloth, wring it out tightly, and place it inside the cardboard.
- Place the vessel in the cardboard box. Do not place the vessel too close to the wet towel to avoid the lacquer to harden too quickly and adhere improperly.
- Also, place the vessel at an angle that the glued surface faces down, so that gravity will push it down.
- To maintain humidity, cover the cardboard with a large plastic bag loosely. If the box is placed horizontally, cover the open side with the plastic bag like a curtain.
- Your muro is complete.
The slower it dries, the more beautifully and firmly it will adhere, so leave it out of the muro for about half a day first, and then in the muro for about 1 week to 10 days.
[6] Cleaning the surface
After it has completely hardened, take it out from the muro and peel off the masking tape. The glue may be sticking out, so use a cutter or waterproof paper to scrape it off.
[7] Making filler
Making the “filler” called “錆漆” (sabi-urushi, literally meaning rusty lacquer) to fill in the gaps with a spatula if they are found after gluing.
- On a work board, add water little by little to about 1 teaspoon of the polishing powder and knead well with a bamboo spatula until the kneaded polishing powder becomes cohesive.
- Add about 8/10ths of the raw lacquer to 1. and knead well with a bamboo spatula.
- When all the ingredients are mixed together and the mixture is the consistency of peanut butter, it is ready to use.
- Mix raw urushi and polishing powder at a ratio of about 10:8.
- Basically, make only the amount you will use. The filler gets harder to dry as the day goes on.
- It is convenient to use a small glass or acrylic plate for working when mixing.
- When adding water to the polishing powder or the raw lacquer, add a little at a time, even if it is troublesome, and keep an eye on the process.
- After use, wipe the bamboo spatula with ethanol diluted with water (if available) and wipe off any dirt with a tissue (because the lacquer on the spatula will harden).
[8] Gap filling
Fill in the gaps with the filler you made. Apply a thin, flat layer of filler with a bamboo spatula to gaps where there are chips or other defects.
[9] Re-drying
Place in muro and leave for 1 to 2 days.
[10] Polishing
Cut a small piece of waterproof paper, dip it in water, and apply it ONLY to the area coated with the filler as much as possible, to polish the surface so that the surface becomes flat. After polishing, wipe off any water on the surface with a tissue.
[11] Colored urushi lacquer
Colored urushi lacquer is applied over the cracks where the filler has been applied.
- Some people use yellow, bengara, or vermilion colored urushi when applying gold powders, while others use lighter colored urushi such as white urushi when applying silver powders.
- Colored urushi should be applied very thinly.
[12] Gold or silver dusting
After about 30 minutes after [11], sprinkle gold or silver powder. Depending on your preference, the process may be completed with colored lacquer.
- Take a small amount of gold dust with a cotton ball and sprinkle it over the colored lacquer. Be careful not to touch the colored lacquer with the part of the cotton ball without the gold dust.
- When the gold dust is applied without any gaps, remove the excess gold dust.
[13] Re-drying and completion
Leave the lacquer in the muro for one to two days. When the lacquer is dry, it is finished.
It is a very elaborate process, but when completed, you will get a very lovable piece of work. Please give it a try!